How to Build a YouTube to MP3 Converter
- CodeMasters Tech

- Mar 31, 2025
- 6 min read
Converting YouTube videos to MP3 is a common project for developers interested in building lightweight tools for quick audio extraction. In this guide, we'll show you how to create a simple YouTube to MP3 converter using JavaScript, the Fetch API, and a third-party API from RapidAPI.
⚠️ Important: Always follow copyright laws. Only convert and download videos that you own, or that are licensed for reuse.
Step 1: Choose the Right API
There isn’t a single standard API for converting YouTube videos to MP3. Instead, multiple third-party APIs offer similar functionality with different performance, limitations, and response formats. Most developers rely on RapidAPI to access these services because it centralizes many APIs in one place and provides built-in testing tools.
When you search for “YouTube to MP3” on RapidAPI, you’ll see options like:
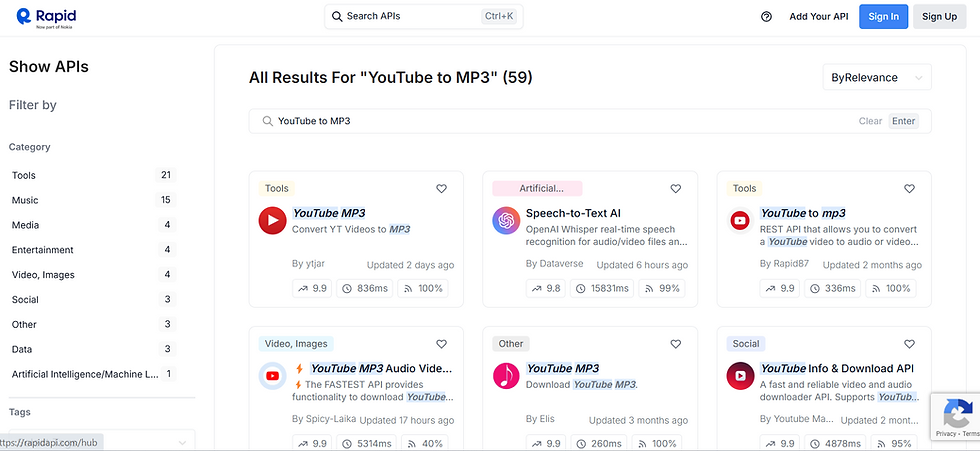
youtube-mp36
yt-mp3
youtube-mp3-downloader
youtube-mp3-free
Each of these APIs may:
Require different parameters (some need a full URL, others just the video ID)
Return different response structures (some give direct MP3 links, others use job IDs you have to poll)
Offer different quality levels (some return 128kbps by default, others support 320kbps)
Have different rate limits or request quotas on the free tier
The best approach is to test each one using the "Test Endpoint" tab on RapidAPI.
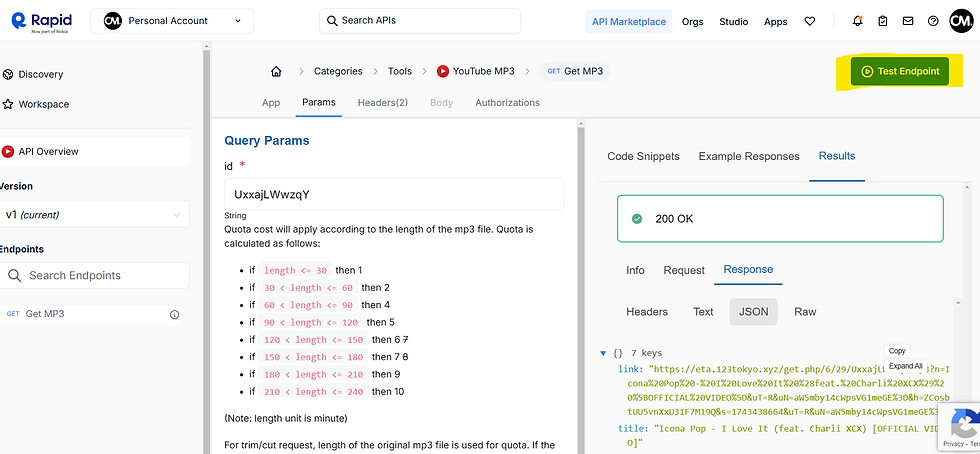
Try a known public video (e.g., a music video or a podcast), and inspect the response. Look for:
Whether it returns an actual MP3 link
How fast the response is
If there's any delay or processing step
Whether the link works in a browser or download tool
Choose an API that’s stable, returns consistent results, and fits your project’s needs. Make sure to read the API docs—some services have very specific instructions.
Step 2: Subscribe to the API and Get Your Keys
Once you’ve selected the API, click into it and hit the “Subscribe to Test” button. Most of these YouTube-to-MP3 APIs have a free tier with a daily or monthly limit. If you're building a proof-of-concept or MVP, the free tier is usually enough.

After subscribing, you’ll get access to the required headers for making authenticated requests. These are usually:
X-RapidAPI-Key — your personal API key that authorizes your usage.
X-RapidAPI-Host — identifies the API host (e.g., youtube-mp36.p.rapidapi.com).
You’ll use these headers in every request. RapidAPI handles the backend routing and usage tracking.
Once you’ve copied these values, you’re ready to start making requests with fetch in JavaScript. If you’re building a frontend app, be cautious—exposing the API key directly in client-side code can be risky. For production apps, proxy the request through a secure backend.
Step 3: Make the Fetch Request
Once you’ve subscribed to the API and copied your keys, you can start making requests using JavaScript.
Most APIs will require a simple GET request with headers for authentication. Below is an example using the youtube-mp36 API.
const videoId = "dQw4w9WgXcQ"; // Example YouTube video ID

fetch(`https://youtube-mp36.p.rapidapi.com/dl?id=${videoId}`, {
  method: 'GET',
  headers: {
    'X-RapidAPI-Key': 'YOUR_RAPIDAPI_KEY', // Replace with your key
    'X-RapidAPI-Host': 'youtube-mp36.p.rapidapi.com'
  }
})
.then(res => res.json())
.then(data => {
  if (data.status === 'ok') {
    console.log("MP3 Link:", data.link);
    // Use this link in your UI for download
  } else {
    console.error("Conversion failed:", data.msg);
  }
})
.catch(err => {
  console.error("API error:", err);
});
Replace the video ID with dynamic input from your user. You can either ask for the full
YouTube URL or just the ID—whichever fits your UI better.
If you’re working on the frontend, remember that exposing your API key publicly isn’t ideal.
For production, route requests through a backend for better security.
Step 4: Add a Frontend and Secure Your API Key with a Backend
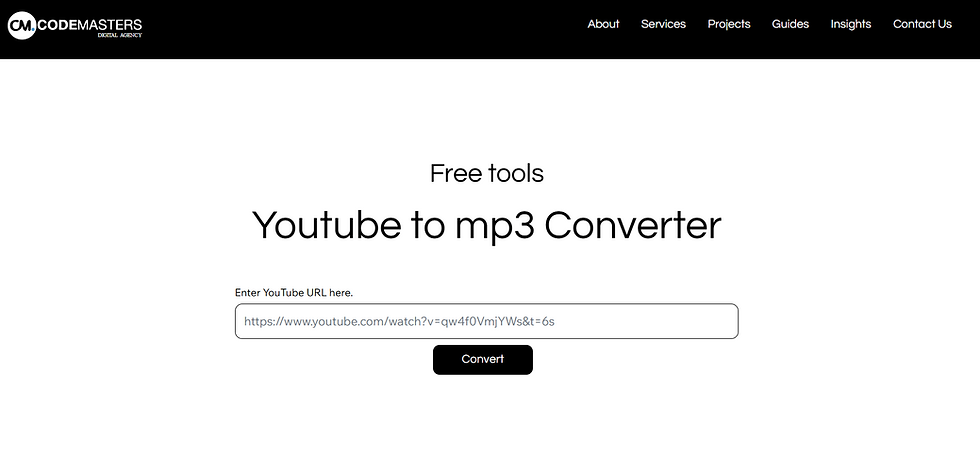
If you're building this as a public-facing tool, avoid calling the RapidAPI endpoint directly from the frontend. Exposing your API key in browser-based JavaScript is a security risk—anyone could copy your key and abuse your usage limits.
Instead, set up a simple Node.js + Express backend to handle the API request. Your frontend can send the YouTube video URL to your backend, which then talks to RapidAPI and returns the MP3 link securely.
Let’s take an example using the YouTube to MP3 by Elis API from RapidAPI (youtube-mp310). This API accepts a full YouTube URL and returns a plain-text response containing the downloadable MP3 link.
Your backend will call this API using your private key, and your frontend will interact only with your backend—not RapidAPI directly. This way, your key stays safe and you stay in control.
Here’s a quick structure:
Backend (Node.js)
Use Express and node-fetch to create a /api/convert endpoint. This receives the YouTube URL, makes the API request to RapidAPI using your private key, and sends the result back.
app.get('/api/convert', async (req, res) => {
 const videoUrl = req.query.url;
 const encodedUrl = encodeURIComponent(videoUrl);
 const apiUrl = `https://youtube-mp310.p.rapidapi.com/download/mp3?url=${encodedUrl}`;
const response = await fetch(apiUrl, {
headers: {
'x-rapidapi-key': 'YOUR_RAPIDAPI_KEY',
'x-rapidapi-host': 'youtube-mp310.p.rapidapi.com'
}
});
const result = await response.text();
res.send(result);
});
Frontend (HTML + JS)
On the frontend, you create an input field for the user to paste the YouTube URL. When they click “Convert,” it sends a request to your backend, which responds with the MP3 link.
  const url = document.getElementById('videoUrl').value;
  const res = await fetch(`/api/convert?url=${encodeURIComponent(url)}`);
  const mp3Link = await res.text();
  document.getElementById('result').innerHTML =
`<a href="${mp3Link}" download>Download MP3</a>`;
}
This setup keeps your API key hidden, reduces abuse risk, and gives you more control over error handling and rate limits.
Step 5: Handling Errors Properly
Not all conversions will work. Some YouTube videos may be private, blocked, region-restricted, or incompatible with the API. You need to handle these cases gracefully on both the frontend and backend.
Backend Error Handling (Node.js)
Wrap your fetch logic in a try/catch block and respond with a proper error message if something goes wrong:
app.get('/api/convert', async (req, res) => {
const videoUrl = req.query.url;

if (!videoUrl) {
return res.status(400).json({ error: 'Missing YouTube URL' });
}

try {
const encodedUrl = encodeURIComponent(videoUrl);
const apiUrl = `https://youtube-mp310.p.rapidapi.com/download/mp3?url=${encodedUrl}`;
const response = await fetch(apiUrl, {
headers: {
	'x-rapidapi-key': 'YOUR_RAPIDAPI_KEY',
	'x-rapidapi-host': 'youtube-mp310.p.rapidapi.com' }
});

if (!response.ok) {
	return res.status(response.status).json({
error: 'Failed to convert video' }); }

const result = await response.text(); res.send(result);
} catch (err) {
	console.error(err);
	res.status(500).json({ error: 'Internal server error' });
	}
});
This makes sure the user receives helpful feedback if something fails—whether it’s a bad URL, an invalid API response, or a network issue.
Frontend Error Handling
On the frontend, catch errors from the fetch call and display a user-friendly message instead of just logging to the console:
async function convert() {
const url = document.getElementById('videoUrl').value;
const resultDiv = document.getElementById('result');

try {
const res = await fetch(`/api/convert?url=${encodeURIComponent(url)}`);

if (!res.ok) {
	const errorData = await res.json();
	resultDiv.innerHTML = `<p>Error: ${errorData.error}</p>`;
	return;
}

const mp3Link = await res.text();
resultDiv.innerHTML = `<a href="${mp3Link}" download>Download MP3</a>`;
} catch (err) {
	console.error(err);
	resultDiv.innerHTML = `<p>Something went wrong. Please try again later.</p>`;
	}
}
Why This Matters
Without proper error handling, users might just see a blank page or broken link when something goes wrong. Adding even simple feedback like "Invalid URL" or "Conversion failed, try a different video" improves the experience and reduces support issues.
More Tools for Developers & Creators
For developers looking to go beyond basic functionality, consider building additional features like batch downloads, audio trimming, or file tagging. You can also optimize the user experience by integrating it into a sleek frontend using platforms like Wix Velo—learn how with Google Maps Customization Using Wix Velo or How to Send Triggered Emails Using Wix Velo.
Final Thoughts: How to Build a YouTube to MP3 Converter
Creating a YouTube to MP3 converter with JavaScript and RapidAPI is a solid way to learn how to integrate external APIs, handle user input, and manage secure backend communication. Throughout this guide, we covered how to choose the right API, test its behavior, make requests using fetch, and protect your API key by routing calls through a backend built with Node.js and Express.
We used YouTube to MP3 by Elis as a working example, but the same structure can be applied to any similar API on RapidAPI. The key is testing thoroughly, handling errors properly, and always thinking about security—especially if you’re exposing the tool to users.
Whether you're building this as a learning project or planning to publish it online, this setup gives you a clean, scalable starting point. From here, you can improve the UI, track analytics, queue conversions, or even add premium features.
FAQs
Do I need a backend to build a YouTube to MP3 converter?
Yes. Most YouTube-to-MP3 APIs (like the ones on RapidAPI) require server-side handling to keep your API key safe and avoid CORS issues. A lightweight backend using Node.js or Express is ideal for this.
Can I convert YouTube videos to MP3 directly from the browser?
Not securely. While it’s possible to trigger conversions from the browser, exposing your API key in frontend code puts your account at risk. For a secure implementation, always handle API calls on the server.
Which API should I use for the converter?
The blog walks you through using the youtube-mp36 API from RapidAPI, but there are several others like yt-mp3 or youtube-mp3-downloader. Test a few to see which gives you the best speed, uptime, and audio quality.
Is it legal to build or use a YouTube to MP3 converter?
It depends on how the tool is used. Converting videos for personal use is typically tolerated, but downloading copyrighted material without permission can violate YouTube’s Terms of Service.
Can I add playlist support to my converter?
Not easily with most free APIs. Playlist downloading often requires premium-level APIs or direct interaction with video metadata. You’d likely need additional API calls and parsing logic to fetch and process each video in a playlist.


%20(460%20x%20280%20px)%20(500%20x%20600.png)

